Conteúdo
- 1 Introdução
- 2 Section 1: Pre-Press Preparation – From Vector Logo to 3 Screens
- 3 Section 2: Custom Fixture Mold – The Key to 100% Tube Fit
- 4 Section 4: Step-by-Step 3-Color Printing Workflow
- 5 Section 6: Applications & Case Study – 3-Color Cosmetic Tube Printing
- 6 Section 7: Frequently Asked Questions (FAQ)
- 7 Section 8: Why Choose Juste Machine for 3-Color Cosmetic Tube Printing?
- 8 Conclusão
Introdução
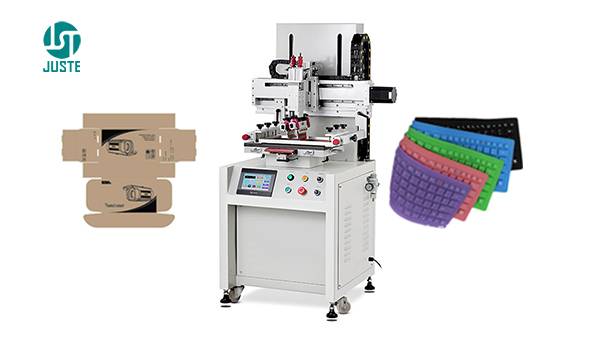
In the cosmetic packaging industry, printing multi-color logos on curved tubes has always been a technical challenge. Misalignment between colors, low production speed, and high rejection rates are common pain points for factory owners and production managers. The JST-R400-CSM automatic screen printing machine solves these problems with servo-driven precision and an intelligent optical registration system. This machine is specifically designed for round, conical, and cylindrical objects such as cosmetic tubes, bottles, and cups.
In this guide you will learn:
-
How to prepare 3 color separation screens from a vector logo file
-
Why custom fixture molds are critical for perfect tube alignment
-
How the automatic registration system achieves ±0.1mm accuracy
Section 1: Pre-Press Preparation – From Vector Logo to 3 Screens
Before any printing begins, the most critical step is converting your logo into three individual screen printing stencils. This process determines the final registration accuracy.
Step 1.1: Color Separation from Vector File
Operação: Open the customer’s logo in Adobe Illustrator or CorelDRAW. Separate the artwork into three individual layers based on color (e.g., Color 1: Black, Color 2: Red, Color 3: Gold).
Purpose / Principle: Screen printing applies one color at a time. Each color requires its own mesh screen. The vector file ensures sharp edges and precise color boundaries.
Key Points to Note: Never use JPEG or PNG for color separation. Always request vector formats (.ai, .cdr, .eps) to maintain dimensional accuracy.
Pro Tip: Add a registration mark (a small crosshair or circle) in the exact same position on all three layers. The LEUZE optical sensor will read this mark for automatic alignment.
![]()
![]()
Step 1.2: Screen Making for Each Color
Operação: Coat three mesh screens with photosensitive emulsion. Expose each screen using the corresponding color separation film. Wash out unexposed emulsion to create the stencil.
Purpose / Principle: High-tension mesh (typically 120-180 threads/cm for cosmetic tubes) ensures clean ink release onto curved surfaces.
Key Points to Note: Use a pneumatic screen stretcher to achieve consistent tension (18-25 Newtons/cm²) across all three screens. Uneven tension causes registration drift between colors.
Pro Tip: Label each screen clearly (Color 1, Color 2, Color 3) and store them in a dust-free cabinet. Scratches or dust on any screen will ruin multi-color jobs.
Section 2: Custom Fixture Mold – The Key to 100% Tube Fit
The Solution: Custom Fixture Mold
Operação: Provide Juste Machine with 5-10 sample tubes. Our engineers measur
e the exact inner diameter, outer diameter, length, and taper angle (if any). We then CNC-machine a dedicated fixture mold that matches your tube’s dimensions to ±0.05mm.
Purpose / Principle: A custom fixture wraps around or inserts into the tube perfectly, eliminating any movement during rotation and printing. The tube sits in the exact same position every cycle – for all three colors.
Key Points to Note: The fixture is made of aluminum or Delrin (acetal) for durability. It includes a rubber O-ring or magnetic grip to hold the tube without scratching.
Pro Tip: Order 3-4 identical fixtures for the same tube size. This allows you to pre-load tubes while the machine is running, increasing output by 30%.
![]()


3.1 What Makes JST-R400-CSM Different?
Esse máquina de serigrafia automática stands out because of three core technologies:
| Recurso | Specification | Buyer Value |
|---|---|---|
| Servo Motors | 2 CNC servo motors | Precise control of printing stroke and index |
| Sistema de controle | PLC + Touchscreen | Easy operation, recipe storage for 100+ tube sizes |
| Registration | LEUZE optical sensor | Fully auto mark registration, no manual adjustment |
±0.1mm 3-Color Overprinting Accuracy: Each of the three colors aligns perfectly with the previous one. This eliminates misprints on expensive cosmetic tubes and reduces material waste to below 1%.
Fully Automatic Mark Registration: The high-sensitivity LEUZE optical sensor reads the registration mark printed in Color 1, then automatically positions the tube for Color 2 and Color 3. The operator simply loads the tube; the machine handles everything else.
Custom Fixture Compatibility: Unlike universal mandrels, our custom fixture molds hold your specific tube with 100% contact. No wobble, no slip – just consistent alignment across all three colors.
Dual Servo Motor Configuration: Two independent CNC servo motors control the printing stroke and fixture rotation simultaneously. This ensures consistent print pressure across tapered conical tubes.
Touchscreen PLC Control: Save up to 100 job recipes. Switching from a 30mm lip gloss tube to a 50mm cream bottle takes less than 5 minutes.
High Production Efficiency: Operating at 1200-1500 pieces per hour, this máquina de serigrafia dramatically reduces labor costs compared to semi-automatic alternatives.

Section 4: Step-by-Step 3-Color Printing Workflow
Step 1: Install Custom Fixture and Load Tube
Operação: Install the custom fixture mold onto the machine’s rotation shaft. Place a cosmetic tube onto the fixture – it should click or slide in with light resistance.
Purpose / Principle: The custom fixture ensures the tube sits at the exact same rotational starting point for every cycle. This is the foundation of multi-color registration.
Key Points to Note: If the tube feels loose, the fixture needs adjustment. Even 0.1mm of play will cause visible misalignment between colors.
Pro Tip: Wipe the fixture with isopropyl alcohol weekly to remove ink residue. Clean fixtures grip better.

Step 2: Install Screen 1
Operação: Mount the screen for Color 1 onto the printing head. Pour the corresponding ink. Set squeegee pressure to 0.4-0.6 MPa via the touchscreen.
Purpose / Principle: The first color prints the base layer – usually the largest area of the logo. It also prints the registration mark that the sensor will read for Colors 2 and 3.
Key Points to Note: Ensure the registration mark is printed in a high-contrast color (e.g., black on white tube) so the LEUZE sensor can detect it easily.
Pro Tip: Run 10 test prints and check that the registration mark is clean and sharp. A smudged mark will confuse the optical sensor.
![]()
Step 3: Color 1 Printing (Automatic Mode)
Operação: Press start. The servo motor rotates the tube into position. The printing head lowers, squeegee traverses, and Color 1 transfers onto the tube.
Purpose / Principle: The servo-driven rotation synchronizes with the squeegee movement, allowing continuous printing around the entire circumference – or partial wrap if programmed.
Key Points to Note: For 3-color jobs, curing between colors may be required. If using UV ink, install a UV LED lamp after Color 1 to dry instantly.
Pro Tip: Record the printing parameters (speed, pressure, rotation angle) as “Recipe 1” in the PLC. You will use the same settings for Color 2 and Color 3.
![]()
Step 4: Automatic Registration for Color 2
Operação: After Color 1 is printed and dried, reload the same tube (or the machine indexes automatically if equipped with multi-station). The LEUZE sensor activates.
Purpose / Principle: The sensor detects the registration mark printed in Color 1. It calculates the exact rotational offset and commands the servo motor to reposition the tube so that Color 2 aligns perfectly over Color 1.
Key Points to Note: This is a fully automatic process – no manual micro-adjustment knobs. Accuracy is ±0.1mm regardless of operator skill.
Pro Tip: The touchscreen displays a live camera view of the registration mark. You can verify alignment before printing Color 2.
![]()
Step 5: Color 2 and Color 3 Printing
Operação: Install Screen 2 (Color 2). Press start. The machine prints the second color using the automatic registration data. Repeat for Screen 3 (Color 3).
Purpose / Principle: Each color layer builds on the previous one. The LEUZE sensor re-reads the original registration mark (from Color 1) for every subsequent color – not the previous printed color. This prevents error accumulation.
Key Points to Note: If the registration mark from Color 1 becomes covered by Color 2 or Color 3, the sensor cannot read it. Always position the registration mark in an area that remains uncovered (e.g., below the logo or on the tube’s non-printed side).
Pro Tip: For 3-color jobs with fine details (e.g., small text or thin lines), print the darkest color first. Light colors printed over dark bases may look muddy.
![]()
Step 6: Final Curing and Quality Check
Operação: After Color 3 is printed, tubes pass through a UV curing oven or IR dryer. Inspect finished tubes under good lighting.
Purpose / Principle: Curing locks in all three colors simultaneously. Any misalignment becomes permanent after curing – so inspect before curing.
Key Points to Note: The finished 3-color logo should have sharp edges with no visible gaps between colors. Use a 10x loupe to check for registration drift.
Pro Tip: Keep the first 50 printed tubes as a quality reference. If future batches show misalignment, compare them to the reference to identify which color shifted.
![]()
Section 6: Applications & Case Study – 3-Color Cosmetic Tube Printing
Por material
| Material | Compatibility with 3-Color Printing |
|---|---|
| Plastic (PP, PET, PE, ABS) | Excellent – requires flame treatment |
| Aluminum (metal tubes) | Excellent – no pre-treatment needed |
| Vidro | Good – requires UV ink and flame treatment |
Real-World Case: 3-Color Lip Gloss Tube for a Korean Brand
Challenge: A Korean cosmetic brand needed 3-color logos printed on 20,000 lip gloss tubes (white tube, black + red + gold logo). The previous supplier used a semi-automatic machine with universal mandrels, resulting in:
-
15% rejection rate due to color misalignment
-
45 seconds of manual registration adjustment per color change
-
Inconsistent print quality between day and night shifts
Solution: Juste Machine provided:
-
3 color separation screens made from the customer’s vector .ai file
-
Custom fixture mold machined from sample tubes (5 tubes provided)
-
JST-R400-CSM automatic screen printing machine with LEUZE sensor
Section 7: Frequently Asked Questions (FAQ)
Q: Are you a manufacturer or a trading company?
A: Shenzhen Juste Machine Co., Ltd. has been a direct fabricante de máquinas de serigrafia since 2002. Our factory is located in Dongguan, China, and we welcome customer visits.
Q: How do you make the 3 screens from my logo?
A: You provide a vector file (.ai, .cdr, or .eps). Our prepress team separates it into 3 color layers. We then expose each layer onto a separate mesh screen using a high-resolution exposure unit.
Q: Why do I need a custom fixture mold for 3-color printing?
A: Universal mandrels cannot achieve 100% tube contact. Even 0.2mm of wobble causes visible misalignment between colors. A custom fixture machined to your tube’s dimensions eliminates this completely.
Q: How many sample tubes do you need to make the fixture?
A: 5-10 sample tubes are ideal. We measure the inner diameter, outer diameter, length, and any taper angle. The fixture is CNC-machined to ±0.05mm tolerance.
Q: Can the JST-R400-CSM print 3 colors on tapered (conical) cosmetic tubes?
A: Absolutely. The servo motor automatically adjusts rotation speed as the tube diameter changes. Combined with a tapered custom fixture, 3-color printing on conical tubes is fully supported.
Q: What is the typical rejection rate for 3-color jobs?
A: With custom fixtures and LEUZE auto-registration, customers typically achieve 98-99% yield (1-2% rejection). Without custom fixtures, rejection rates often exceed 10%.
Q: Do you provide a warranty and technical support?
A: Yes, we offer a 1-year warranty on all machines, plus lifetime technical support. We provide video training, manuals, and optional on-site installation.
Q: What is your lead time for custom fixtures?
A: After receiving sample tubes, fixture production takes 7-10 working days. The machine itself ships within 15-20 working days.
Q: Can I use UV ink for all 3 colors?
A: Yes. We recommend a UV LED curing system between colors to prevent smudging. Read our guide on UV Dryer vs IR Dryer for more information.
Section 8: Why Choose Juste Machine for 3-Color Cosmetic Tube Printing?
Since 2002, Juste Machine has specialized in multi-color printing solutions for curved packaging. Unlike general trading companies, we understand the unique challenges of 3-color registration:
-
In-house prepress: We produce your color separation films and expose screens – no outsourcing delays
-
Fixture engineering: Our CNC shop machines custom fixtures from your sample tubes
-
Machine + tooling package: We deliver a complete system (printer + screens + fixtures + curing) ready for 3-color production
For more technical details, visit our JST-R400-CSM product page.
Conclusão
From a vector logo file to a finished 3-color cosmetic tube, every step matters – color separation, screen making, custom fixture machining, and automatic registration. The JST-R400-CSM automatic screen printing machine ties these steps together with ±0.1mm precision, eliminating manual alignment and reducing waste.
Ready to upgrade your 3-color production line? Contact Máquina Juste today for a free consultation and a customized quote including custom fixtures and screens.
📧 Email: [email protected]
💬 WhatsApp: Click to chat
🌐 Website: www.justemachine.com