Contents
- 1 Introduce
- 2 The Printing Workflow: Step-by-Step
- 3 Post-Printing Cleanup: Preserving Your Screen for Future Use
- 4 Key Components – The Technology Behind Precision Printing
- 5 Applications – What Can You Print?
- 6 Frequently Asked Questions (FAQ)
- 7 Why Choose Juste Machine for Your Printing Needs?
- 8 Ready to Upgrade Your Production Line?
Introduce
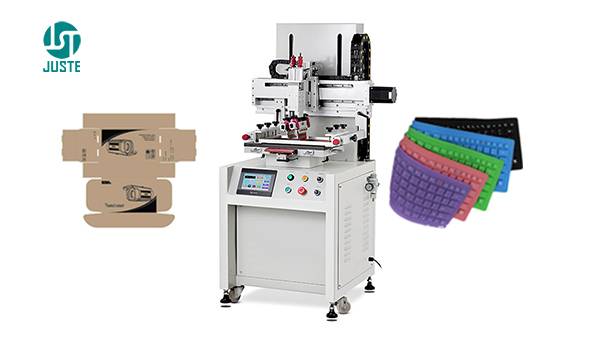
Learn how to print on polygonal glass bottles with a semi automatic screen printing machine. Step-by-step guide covering setup, operation, and key components.
Step 1: Install Squeegee and Flood Coater
Operation: Install the squeegee (scraper) and ink flood coater (recovery blade) onto the printing head assembly.
Purpose / Principle: The squeegee pushes ink through the mesh screen onto the glass bottle surface. The flood coater returns excess ink across the screen for the next cycle. Together, they ensure consistent ink deposition and prevent ink drying on the screen.
Key Points to Note:
- Check that the squeegee blade is straight and free from nicks or wear—any imperfection will show on the print
- Adjust squeegee angle and pressure according to ink viscosity and bottle material
- For UV ink applications, ensure compatibility with your curing system
Pro Tip: Keep spare squeegee blades on hand. Glass printing is abrasive, and worn blades are the #1 cause of inconsistent print quality.
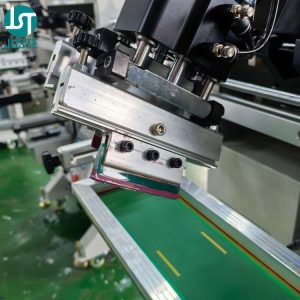
Step 2: Mount the Screen Frame – Ensure Zero Tilt
Operation: Install the prepared screen plate onto the machine frame. Use a level or the machine’s micro-adjustment mechanisms to ensure the screen is perfectly horizontal and not tilted.
Purpose / Principle: A tilted screen will cause the design to shift on different faces of a polygonal bottle. Because the machine prints one face at a time through synchronized movement, any screen misalignment multiplies across all faces, resulting in a visually unappealing, “walking” pattern.
Key Points to Note:
- Maximum screen frame size: 550×300mm
- Ensure proper screen tension—loose screens cause blurry edges
- The screen must be parallel to the worktable in both X and Y axes

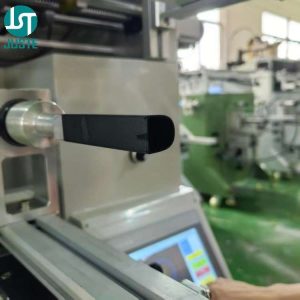
Step 3: Install the Custom Fixture for Your Polygonal Bottle
Operation: Mount the custom-machined fixture onto the rotary axis. Secure the glass bottle into the fixture.
Purpose / Principle: Every polygonal bottle shape—triangle, quadrilateral, pentagon, hexagon, heptagon, octagon—requires a custom fixture that matches its exact contour and size. The fixture holds the bottle rigidly during printing and ensures its center axis aligns perfectly with the rotary drive axis.
Key Points to Note:
- Fixtures must be custom-made for each bottle shape AND size—a hexagonal fixture for a 50ml bottle will not work for a 100ml bottle
- The fixture must grip the bottle securely without causing deformation or stress marks
- For glass bottles, consider using soft-touch fixture materials to prevent scratching
Pro Tip: Order multiple fixtures for your most common bottle SKUs. Quick changeover between fixtures dramatically reduces downtime for small-batch production runs.
The Printing Workflow: Step-by-Step
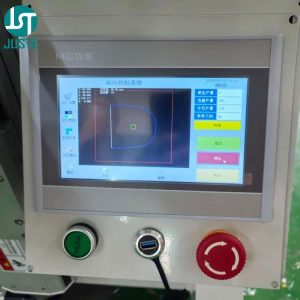
Step 4: Configure Parameters on the Touchscreen Controller
Operation: Use the touchscreen controller to set all printing parameters for your specific polygonal bottle.
Purpose / Principle: The touchscreen is the command center for the glass bottle screen printing machine. It allows you to configure:
| Parameter | Function |
|---|---|
| Printing stroke length | Sets screen travel distance to match the printable area |
| Worktable height | Determines the contact point between bottle and screen |
| Rotary axis rotation count | Number of faces on the polygon (e.g., 6 for hexagon) |
| Print cycles | Number of passes per face (1 for standard, 2+ for heavy coverage) |
| Polygon printing mode | Enables the synchronization algorithm for non-cylindrical shapes |
Key Points to Note:
- The USB port below the touchscreen is used to upload 3D structural drawings for each polygon product
- Each unique polygon shape requires its own 3D drawing, created on a computer and uploaded via USB
- The controller uses this 3D data to calculate the precise synchronization between screen movement and rotary axis rotation
Pro Tip: Name your uploaded files clearly (e.g., “Hexagon_50ml_v1.dat”) and maintain a library on your computer. When you run the same bottle again, simply re-upload the file instead of re-creating it.
Step 5: Manual Loading and Printing
Operation: Place the glass bottle into the fixture manually. Press the foot switch to initiate the automatic printing cycle.
Purpose / Principle: This is a semi-automatic screen printing machine—operators load and unload products manually, while the printing cycle runs automatically. When you press the foot switch:
- The worktable rises, bringing the bottle’s quadrant point (highest point of the current face) into contact with the screen
- The squeegee presses down while the screen moves horizontally
- Simultaneously, the rotary axis rotates in precise synchronization with screen movement
- After one face is printed, the worktable lowers slightly, the rotary axis indexes to the next face, and the cycle repeats
- After all faces are printed, the worktable fully lowers
Key Points to Note:
- Printing speed: up to 1500 pieces per hour (operator-dependent)
- Air pressure requirement: 0.5 MPa
- Always wear appropriate PPE when handling glass and inks
Step 6: Unload and Inspect
Operation: Remove the printed bottle from the fixture manually. Inspect print quality on all faces.
Purpose / Principle: Each face of a polygonal bottle should display consistent ink coverage, sharp edges, and correct color. Because the machine uses servo motor synchronization, registration between faces should be precise.
Key Points to Note:
- If using UV ink, the bottle must pass through a UV curing oven after printing—the screen printing machine itself does not cure ink
- For plastisol ink, heat curing is required
- Inspect for: incomplete ink transfer, screen marks, misregistration, and surface defects
Post-Printing Cleanup: Preserving Your Screen for Future Use
Operation: Immediately after finishing the printing run, remove the screen, squeegee, and flood coater for cleaning.
Purpose / Principle: Ink dries quickly on screens, especially UV and solvent-based inks. Dried ink blocks mesh openings, ruins future prints, and shortens screen life. Proper cleanup ensures consistent quality for the next job.
Key Points to Note:
- Use the appropriate screen cleaner for your ink type (solvent-based, UV, or water-based)
- Clean both sides of the screen gently—excessive scrubbing damages the emulsion
- Apply a protective coating or store screens flat in a dust-free environment
Key Components – The Technology Behind Precision Printing
Servo Motor for Worktable Vertical Movement
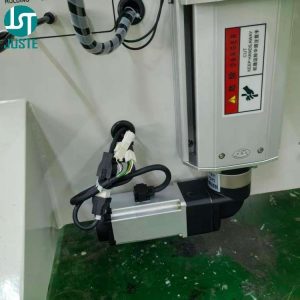
Description: This servo motor controls the precise up-and-down movement of the worktable. During printing, it raises the bottle so the quadrant point contacts the screen; after each face is printed, it lowers the table for indexing.
Key Features:
- INOVANCE brand servo motor – industry-recognized for reliability and precision
- Programmable lift height – adjustable via touchscreen for different bottle sizes
- Smooth acceleration/deceleration – prevents glass breakage from sudden movements
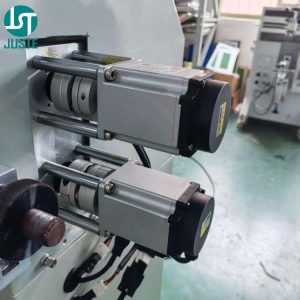
Servo Motor for Fixture Rotary Synchronization
Description: This is the core technology for polygonal printing. It drives the fixture rotation in perfect synchronization with screen movement, ensuring each face receives the design at the correct angle.
Key Features:
- Multi-axis synchronization – works with screen movement servo motors for coordinated motion
- Polygon-specific indexing – rotates exactly the angle between faces (e.g., 60° for hexagon)
- Zero-backlash design – eliminates positioning errors that would cause misregistration
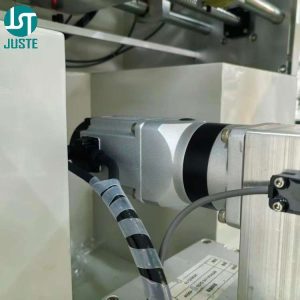
Dual Servo Motors for Screen and Print Head Movement
Description: Two servo motors work together—one drives the screen’s horizontal movement, the other controls the print head (squeegee/flood coater) vertical motion and pressure.
Key Features:
- Independent control – allows fine-tuning of screen speed and squeegee pressure separately
- Synchronized with rotary axis – all three servo motors operate in coordinated motion for distortion-free polygonal printing
- Programmable speed profiles – optimize for different ink types and bottle materials
Touchscreen Controller with USB Interface
Description: The intuitive touchscreen interface allows operators to configure all machine parameters. The USB port enables uploading of 3D structural drawings for each polygon product.
Key Features:
- Centralized control – all parameters accessible from one screen
- USB file upload – each polygon shape requires a computer-drawn 3D structure file uploaded via USB
- Multi-color registration support – with optional contrast sensor, enables multi-color printing
Applications – What Can You Print?
This cup screen printer and bottle screen printing machine handles an exceptionally wide range of products.
By Material:
- Glass – perfume bottles, wine bottles, cosmetic jars, drinking glasses
- Plastic – PP, PET, PVC, Acrylic, Silicone
- Metal – aluminum bottles, cosmetic tubes, cans
- Others – ceramic, wood, bamboo, paper
By Industry:
| Industry | Product Examples |
|---|---|
| Cosmetic Packaging | Foundation bottles, perfume bottles, lipstick tubes, cream jars, nail polish bottles |
| Beverage & Spirits | Wine bottles, liquor bottles, drink bottles, honey jars |
| Daily Chemicals | Shampoo bottles, shower gel bottles, lotion bottles, detergent containers |
| Pharmaceutical | Syringes, reagent bottles, ampoules |
| Food | Oil bottles, sauce bottles, honey jars, spice jars |
By Shape:
- Polygon – Triangle, quadrilateral, pentagon, hexagon, heptagon, octagon
- Cylindrical – Round bottles and cups
- Other – Oval, square, and custom shapes with custom fixtures
Frequently Asked Questions (FAQ)
Q: Are you a manufacturer or a trading company?
A: Shenzhen Juste Machine Co., Ltd. has been a direct screen printing machine manufacturer since 2002, with our factory located in Dongguan, China. We design, engineer, and assemble all machines in-house.
Q: Can this machine print on polygonal glass bottles?
A: Absolutely. This machine is specifically designed for polygon products—triangle, quadrilateral, pentagon, hexagon, heptagon, and octagon shapes. With a custom fixture and a 3D drawing uploaded via USB, it handles any polygon shape precisely.
Q: What is the printing speed?
A: The machine operates at up to 1500 pieces per hour, depending on operator loading speed and bottle size. This makes it ideal for small-to-medium batch production.
Q: Do you provide a warranty and technical support?
A: Yes, we offer a 1-year warranty on all machines covering manufacturing defects. We also provide lifetime technical support, video training, and remote troubleshooting.
Q: How does the machine handle multi-color printing?
A: The machine supports multi-color registration with an optional contrast sensor. After printing one color, change the screen and ink, and the sensor locates the pattern for precise second-color alignment.
Q: What is the lead time for a customized machine?
A: Standard machines ship within 15-20 working days. Customized machines with special fixtures or configurations require 25-30 working days.
Q: Can I use UV ink with this machine?
A: Yes, you can use UV ink. However, UV ink requires a separate UV curing oven after printing—the screen printing machine itself does not include curing functionality. Read our guide on UV Dryer vs IR Dryer for more information.
Why Choose Juste Machine for Your Printing Needs?
Since 2002, Shenzhen Juste Machine Co., Ltd. has been a trusted screen printing machine manufacturer for businesses worldwide. Our machines feature:
- Premium brand components – AIRTAC cylinders (Taiwan), SMC/AIRTAC solenoid valves, INOVANCE servo motors
- Competitive pricing – factory-direct pricing with no middleman markups
- Easy operation – intuitive touchscreen control and straightforward setup
- Customization support – custom fixtures, OEM branding, and special configurations available
The semi automatic glass bottle screen printing machine is one of our most versatile solutions, combining affordability with industrial-grade performance.
Ready to Upgrade Your Production Line?
📧 Email: [email protected]
💬 WhatsApp: Click to chat
🌐 Website: www.justemachine.com
Not sure which screen printing machine fits your plastic cup? Or need a custom fixture mold for your metal tube, plastic tube, plastic cup?
👇 Click my photo below to chat with me directly on WhatsApp — I’ll send you a free tailored quote within 8 hours.